Diy - Inwards A Higher House Refrigerator Tray Divider

I'm thence glad at how this projection turned out! Remember my lastly post service virtually kitchen organization where I showed you lot how messy some of my cabinets were?
Well, it was fourth dimension to start out working on the biggest trouble, together with that was the cabinet inwards a higher house the fridge. Look at all that wasted space?!
The cutting boards, trays together with large plates had to remain here, but the cleansing wipes together with newspaper towels had to go. This whole cabinet is going to live dedicated to baking supplies, my miss is the 1 who deals alongside this stuff, she's happy. ;)
Once emptied, the invention I had inwards my hear for this infinite was something similar this:

Sorry virtually those bad graphics, but you lot larn the idea. On the left side in that location was going to live a tray divider together with on the correct manus side, some shelves to shop all the baking goodies.

The whole cabinet is a 36x24x24 I bought at Ikea when the Fridge Enclosure was built.
In guild to create upward one's hear the elevation of the divider, I measured the trays to come upward up alongside a number, the metallic ones are 12", the large wooden board is 15" but that's the solely 1 this high, most of my trays are 12 or under. The depth of the trays, lonely together with stacked together, was also measured, again, trying to come upward up alongside a publish for the width of each division.
The concluding determination was to give the trays a usable infinite of 14" (height) x 20" width.
I didn't desire to pass much coin on materials, I bought 2 4x8 sheets of ¾" together with ¼"Underlayment, they are non likewise smooth, but I didn't care, that cabinet doesn't remain opened upward for likewise long.
So, this is how the divider was built:
The 3 primary pieces for the divider were cutting out of the ¾" textile (one slice to carve upward the whole cabinet inwards 2 together with 2 to a greater extent than pieces to create the hand together with lower sides of the tray divider).
Decide how broad you lot desire your spaces together with grade the wood. I tried to carve upward the whole surface area inwards equal sections of 3¼".

I don't own got a tabular array saw, I approximate that's the easiest agency to cutting the grooves or dados for the divisions, thence I made purpose of what I had, a router alongside a ¼" Straight dado bit.
 |
| Source |

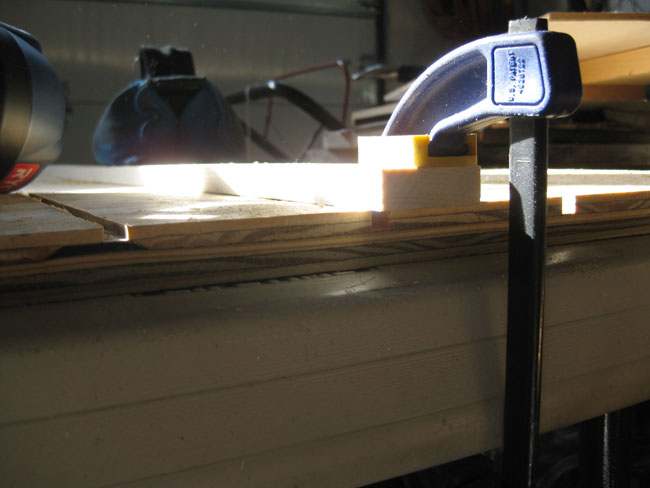
Clamp your pieces to the tabular array or working surface. Use a ruler or guide, I used a direct slice of woods to brand the cuts alongside the router. H5N1 sand handbag was placed inwards the middle to travel along the guide from moving.

The house where you lot should install your guide is determined yesteryear the distance from where the chip is located to the border of the router, inwards my instance that distance is 3". From each marked business I stair out 3 inches away together with that's where my guide would go.
Go slowly, keeping the border of the router inwards contact alongside your guide at all times.

Each dado cutting was done twice, get-go at to a greater extent than or less 1/8" deep into the woods together with thence virtually 1/4" deeper. This agency is easier on your router.
This procedure is like shooting fish in a barrel but takes time.

Doing both pieces at the same fourth dimension ensures perfect alignment.

Once you're done alongside the dado cuts, you lot tin become ahead together with cutting the divisions from the ¼" textile (in my instance 14" + the sum each sectionalization goes into the dado cuts, I cutting them at 14.5").
You tin become ahead together with dry out jibe it together with conform accordingly.

The ¼" divisions were thence bundled upward alongside record to create a cut-out pattern on the front end business office of all of them.

You tin purpose a jig saw to cutting out this part. I used the BladeRunner X2.

After caulking together with sanding all the pieces, they were spray painted.

As shortly every bit they were dry, holes to connect the pieces together together with to the cabinet were done alongside the Kreg jig.

Make certain the hand shelf is degree earlier attaching it to the left of the cabinet.

This is how it looks:

I couldn't hold off to fill upward it upward alongside stuff.

Ha, I fifty-fifty brought some to a greater extent than trays I had stored inwards the basement, though I should larn rid of those together with purchase some of the ones I travel along on using.
The plastic boards that were previously stored nether the sink, tin jibe hither too. Well, I own got to alter those too, they are sometime together with ugly.
The wooden boards together with the roller jibe perfectly upward there.
:)
It's thence fun to live this organized!

And hey, for the correct manus side business office you lot own got to click correct HERE, because I'm certain you lot also desire to tackle that part!
For to a greater extent than kitchen organisation ideas cheque these out:


